


Sun Prints
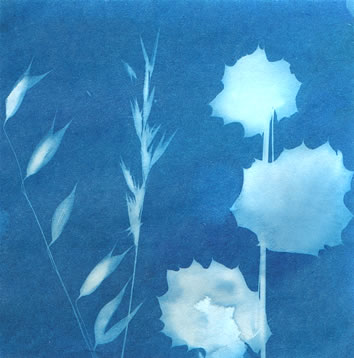
This week’s activity is making sun prints, also known as cyanotype prints. Sun prints can be made on special light-sensitive paper often known as sunprint paper, on dark construction paper, or on fabric that has been treated with a sun-sensitive solution or paint. The basic idea is the same: place objects onto the surface to be printed while in a place with low light, then place the arrangement in the sun for a specified period of time, and then then remove the objects and complete your masterpiece. Here are instructions for each type of project:
Construction paper method: You will need dark-colored construction paper (dark blue or black work best) and interesting objects to print. Place the paper outside in the sunshine and arrange the objects on top of the paper. You may wish to place a clear plastic or glass flat object (a glass baking dish can work) or plastic wrap secured at the edges by tape or some kind of weight over the paper to keep the design and paper in place. Leave everything outside in the sun for 2 - 4 hours, then remove the clear cover and the objects and enjoy your creation! Here are some examples:
Sunprint paper method: You will need Sunprint paper, an acrylic sheet or something flat that is glass, cardboard or another base surface, a tub or water, and interesting objects to print. This process only takes a few minutes, and requires that the paper be rinsed in water. Here are complete instructions: https://www.sunprints.org/how-it-works/.
Making sunprints on fabric: You can paint dark acrylic paint mixed with water onto white cotton fabric, such as old sheets, a pillow case, kitchen towels, or t-shirts, and then print objects onto the material. Here are complete instructions: https://tinkerlab.com/how-to-make-sun-prints-fabric/.
Making your own sunprint paper and fabric: (Advanced – requires adult supervision required) If you love the beauty of cyanotype prints, you can make your own solution to convert watercolor paper to sunprint paper. You can use this solution to make cyanotype photos and even print on fabric. You can use a ready-made solution such as Lumi Inkodye kit or follow this link with detailed instructions to make your own solution: https://rosieresearch.com/diy-cyanotype-sunprint-paper/.
Post your challenge creations on this week's Padlet HERE


Super Bounce Ball
This week’s activity is to make a super bouncy ball. In addition to being fun to play with after you make it, this super ball can teach a little about polymers and the physics of bouncing. The instructions are from the NatGeo Kid’s book entitled Try This!
Here is what you need:
- · borax (check laundry section of grocery store)
- · cornstarch (in baking section of store)
- · white glue (to make an opaque ball) or blue or clear school glue (to make a translucent ball)
- · warm water
- · food coloring (optional)
- · spoon
- · small containers for mixing
- · measuring spoons
- · permanent markers to decorate the ball (optional)
- · resealable plastic bag to store the ball
Here is a link to step-by-step instructions: https://kids.nationalgeographic.com/explore/books/try-this-hub/super-ball/. You can decorate your ball with permanent markers. Be sure to use adult supervision when making super bouncy balls and store them in a resealable plastic bag so they don’t dry out!
Post about your challenge creation on this week's Padlet by clicking HERE


Start With Smooth Rocks

Add Your Kindness Creativity

Snap Pics and Share!

CRAYON MELT ART CHALLENGE
You'll need:
- Crayons (Crayola brand wax gave the best results, other brands were oily.)
- Hair dryer
- Glue or glue gun
- Cardboard, canvas, foam core or posterboard
Watch the video for directions or do an internet search for "melted crayon art." There are so many fun ideas. Create art for your school space or for anywhere that needs a pop of color!
We'd love to see what you create -- post your challenge picture on this week's Padlet: https://padlet.com/showerton2/qi4w2y6kr8pdn4r6


UP-CYCLE DIY CHALLENGE
This week's challenge is to up-cycle items around the house into useful projects. Find items that you would typically just throw out, and give them new life. Re-purpose an old bag from chips . . . re-use the box from your soda . . .
Find new use for those items, and share your projects and creations.
A quick internet search will give you more ideas and inspiration.
Post your challenge creations on this week's Padlet: https://padlet.com/showerton2/aohtoge1wenh757c


Remember to share your pictures on Padlet!
Week of June 8th through June 14th Padlet: https://padlet.com/showerton2/aohtoge1wenh757c
Week of June 15th through June 23rd Padlet: https://padlet.com/showerton2/qi4w2y6kr8pdn4r6
Week of June 22nd through June 29th Padlet: